Community
Share your experience!
Turn on suggestions
Auto-suggest helps you quickly narrow down your search results by suggesting possible matches as you type.
Showing results for
- Community
- Xperia
- Other/General
- Problems with screen. Automatically turns on itsel...
Options
- Subscribe to RSS Feed
- Mark Topic as New
- Mark Topic as Read
- Float this Topic for Current User
- Bookmark
- Subscribe
- Mute
- Printer Friendly Page
Problems with screen. Automatically turns on itself.
SOLVED
Not applicable
- Mark as New
- Bookmark
- Subscribe
- Mute
- Subscribe to RSS Feed
- Highlight
- Report Inappropriate Content
January 2012
January 2012
Hi all,
Please help. I have problems with my screen. After auto turn off or after I turn of screen it automatically starts again after some time and it doesn't turn off automatically. It's displaying main window all the time. Please help, because my battery doesn't last long with this problem. What do i need to do? I tried to load restore old system settings (that were when i bought the phone) with "Backup and restore" software but it didn't help. Tried turning on and off mobile, removing and inserting battery, removing and inserting SIM card.
Solved! Go to Solution.
1 ACCEPTED SOLUTION
Accepted Solutions
- Mark as New
- Bookmark
- Subscribe
- Mute
- Subscribe to RSS Feed
- Highlight
- Report Inappropriate Content
January 2012
January 2012
Update Service (SEUS)
http://dl-www.sonyericsson.com/cws/download/1/110/61/1309763183/Update_Service_Setup-2.11.7.13.exe
don't forget to mark the Correct & Helpful Answers
This is how to root
http://forum.xda-developers.com/showthread.php?t=1312859
you can unroot anytime either by using the rooting method again or by using PCC or Update Service
11 REPLIES 11
- Mark as New
- Bookmark
- Subscribe
- Mute
- Subscribe to RSS Feed
- Highlight
- Report Inappropriate Content
January 2012
January 2012
simple
go to settings -> display -> screen timeout -> 30seconds should be enough
- Mark as New
- Bookmark
- Subscribe
- Mute
- Subscribe to RSS Feed
- Highlight
- Report Inappropriate Content
January 2012
January 2012
go to settings -> about phone
do you have android 2.1 or 1.6?
either or backup everything and then use SEUS to update/repair your phone
Other ways to backup
Don't forget to mark the Correct & Helpful Answers
Contacts
just to play it safe sync your contacts w/ google if you haven't already
open your phonebook
press MENU button -> tap on Send Contacts -> select all -> send it to your email
on your computer
-> download the file -> go to your gmail -> click on contacts -> click on more actions -> on the drop down menu click on "import" -> choose the file -> and click import
SMS/MMS
if you don't want to use the backup & restore app then
Install "backup SMS" to back up your SMS and MMS to your Gmail
https://market.android.com/details?id=com.zegoggles.smssync&feature=search_result
or your SMS use
"backup & restore SMS"
https://market.android.com/details?id=com.riteshsahu.SMSBackupRestore&feature=search_result
or for your MMS use "Save MMS"
https://market.android.com/details?id=com.schwimmer.android.mmsextract&feature=search_result
Call Logs
And for call logs this is great
https://market.android.com/details?id=com.yang.android.ansta
Apps
Don't worry so much about backing up your apps
on your computer go to
market.android.com -> log in -> click on My Library -> and send all your apps to your phone


My Phone Explorer
https://market.android.com/details?id=com.fjsoft.myphoneexplorer.client&hl=en
if you have a lot of sms/mms the backup & restore will take forever or might not backthem up corectly
both apps above Backup SMS + and backup & restore SMS are great, this last one it's really fast
- Mark as New
- Bookmark
- Subscribe
- Mute
- Subscribe to RSS Feed
- Highlight
- Report Inappropriate Content
January 2012
January 2012
Update Service (SEUS)
http://dl-www.sonyericsson.com/cws/download/1/110/61/1309763183/Update_Service_Setup-2.11.7.13.exe
don't forget to mark the Correct & Helpful Answers
This is how to root
http://forum.xda-developers.com/showthread.php?t=1312859
you can unroot anytime either by using the rooting method again or by using PCC or Update Service
- Mark as New
- Bookmark
- Subscribe
- Mute
- Subscribe to RSS Feed
- Highlight
- Report Inappropriate Content
January 2012
January 2012
if you want
apps2SD on 2.1
http://forum.xda-developers.com/showthread.php?t=800555
but I prefer this
this is how to add more Internal Memory it's a long process but its worth it
don't forget to mark the Correct & Helpful Answers
1) backup everything (Check bellow)
2) backup your SD card
on your PC
1) open any folder -> click on tools -> properties -> view -> show hidden files
2) mount the SD card, go to your SD card, press Ctrl + A then Ctrl C, on your desktop create a new folder, open it, then press CTRL + V
now this is where it gets AWEOME-ER
Guide to using Link2SD on your Xperia smartphone
This guide may seem lengthy, but trust us when we say it is straightforward. All steps have been documented which makes it look daunting. Read each section carefully and follow the steps outlined to install Link2SD.
1. PREPARATION
Please make sure you have completed all of the following before starting the tutorial.
On your PC:
– Install the necessary drivers for your Xperia smartphone onto your PC/laptop. The easiest way to do this is to ensure that Sony Ericsson PC Companion is installed on your PC. Once installed, connect your phone to complete the process.
– Download and install MiniTool Partition Wizard onto your PC or laptop.
On your Xperia:
– Enable USB de-bugging mode: Setting –> Applications –> Development –> Tick ‘USB debugging’
– Enable the ability to install unknown apps: Setting –> Applications –> Tick ‘Unknown sources’
– Install Link2SD from Android Market onto your Xperia smartphone. It is a free download.
2. ROOT
3. BACKUP MEMORY CARD
As we will be creating a partition on your microSD memory card, make sure you create a backup just in case anything goes wrong.
a) Create a new folder on your PC and name it anything you want, such as ‘SD_Backup’
b) Connect your phone to the PC, navigate to your memory card and copy the contents to the backup folder.
4. CREATE SECONDARY PARTITION
You now need to create a secondary partition on your microSD memory card that will enable you to use Link2SD.
Note: We will use MiniTool Partition Wizard to create a secondary partition on your microSD card. This partition can be ext2, ext3, ext4 or FAT32. We will use FAT32 as it is supported on all phones and should lead to less troubleshooting later. You can use any partition manager of your choosing, but the steps below guide you through MiniTool Partition Wizard.
There is no need to wipe your memory card when going through this process, just ensure you have at least 0.5GB to 1.0GB of free space to make it worthwhile. You also do not need to use a microSD card adaptor as the process below creates the partition whilst the phone is connected to your PC.
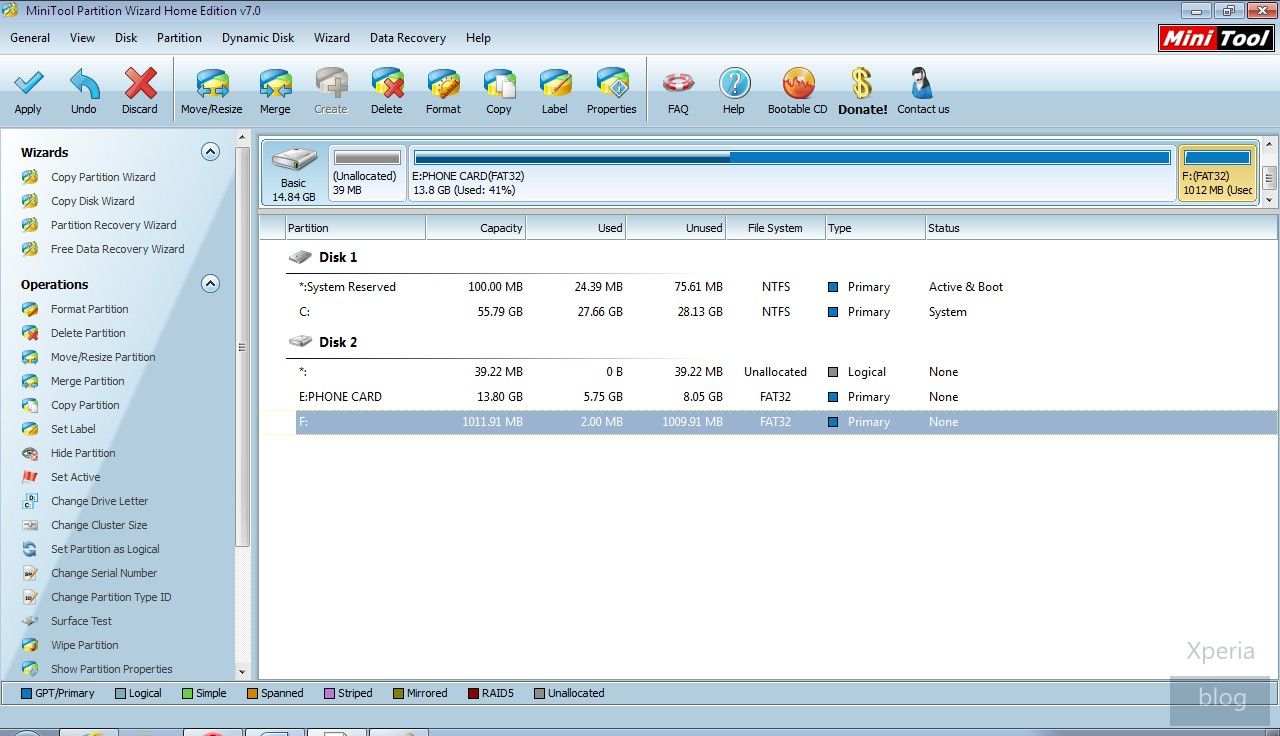
a) Connect your handset to the PC via USB and then launch MiniTool. You should see the details pop up under ‘Disk 2′.
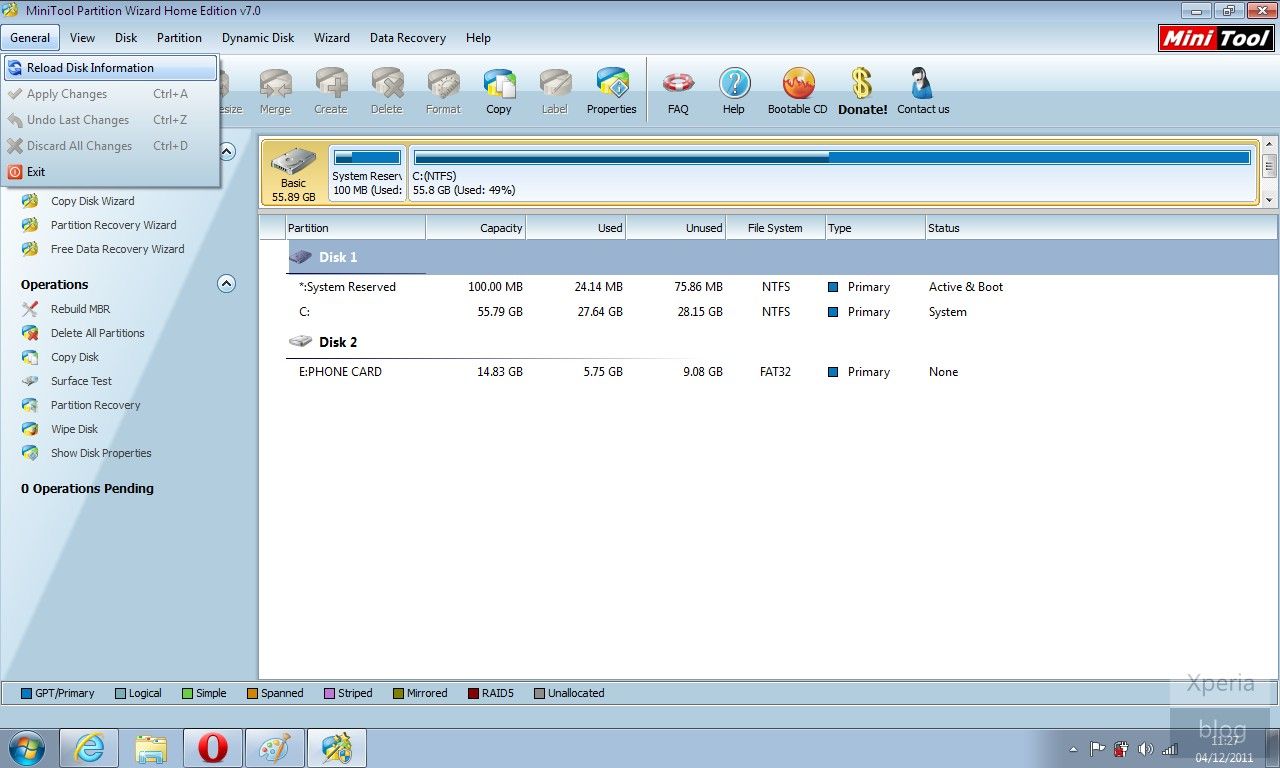
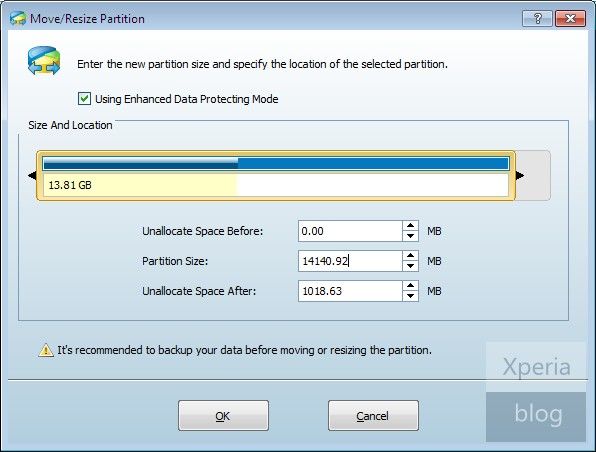
b) Click on the memory card under Disk 2 in MiniTool and then in the left pane, press ‘Move/Resize Partition’. On the blue bar under ‘Size and Location’, move the right arrow towards the left to create the size of the secondary partition desired. In the example below we created a secondary partition with 1018.63MB of space. This value can also be typed in manually in ‘Unallocate Space After’.
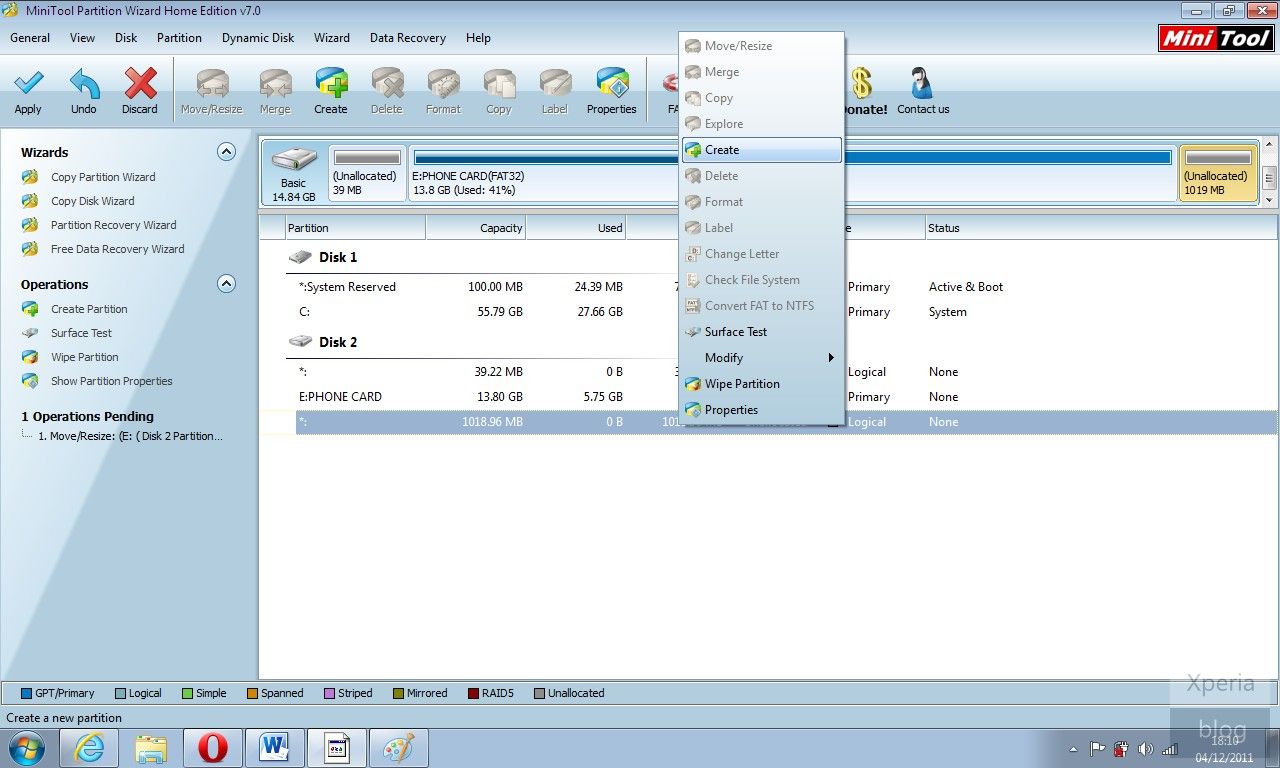
c) Once this is done you should see that your memory card is now split into two partitions under Disk 2 of MiniTool. Right click this new partition and then press ‘Create’.
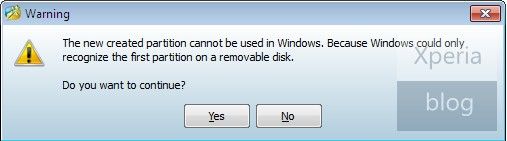
If you see this pop-up below, just press ‘Yes’ to continue.
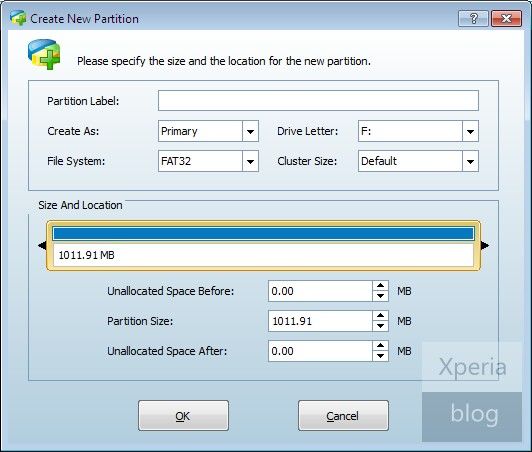
d) You should then see this ‘Create New Partition’ window. Under ‘Create As’ click Primary and then under ‘File System’ click FAT32. Leave the cluster size as default and you can assign whichever drive letter you want. Once finished press OK.
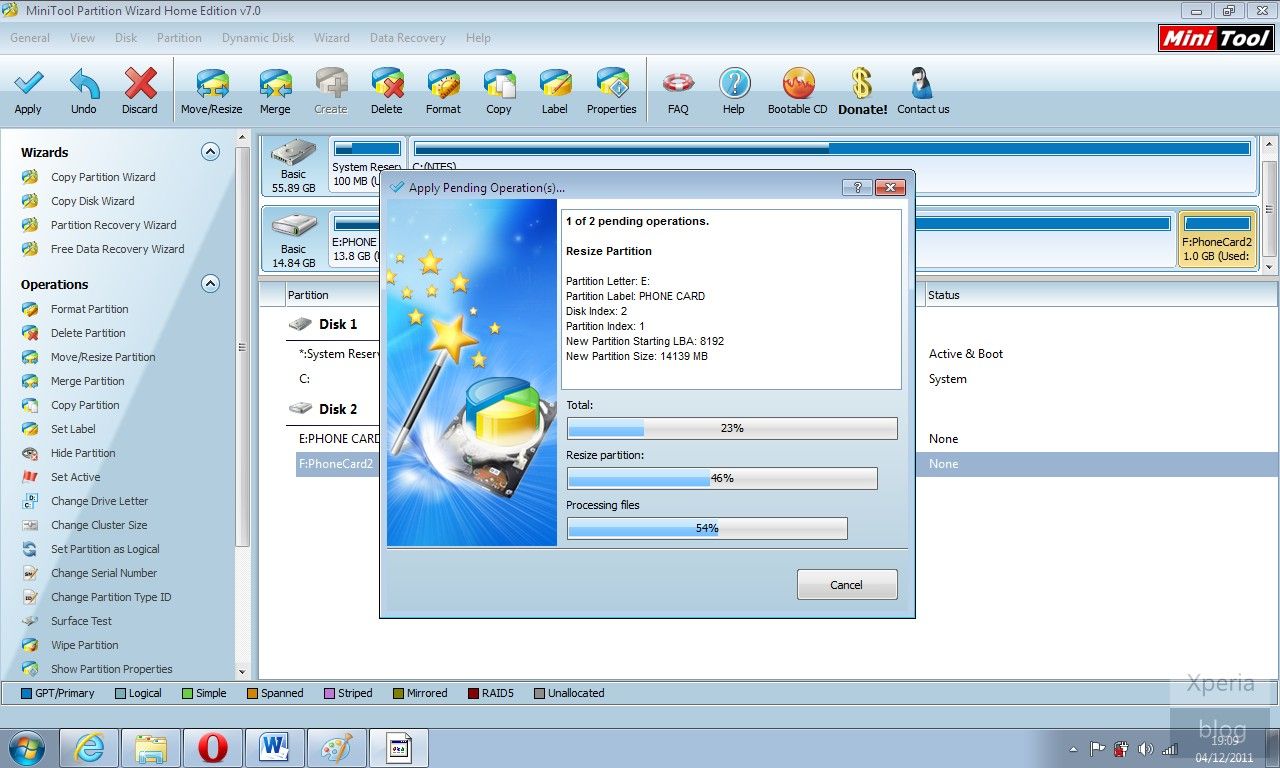
e) This should bring you back to the main MiniTool screen. Now hit the ‘Apply’ button on the top-left of the screen, denoted by a tick symbol.
This will bring up another pop-up window and will take several minutes to both resize and create the secondary partition.
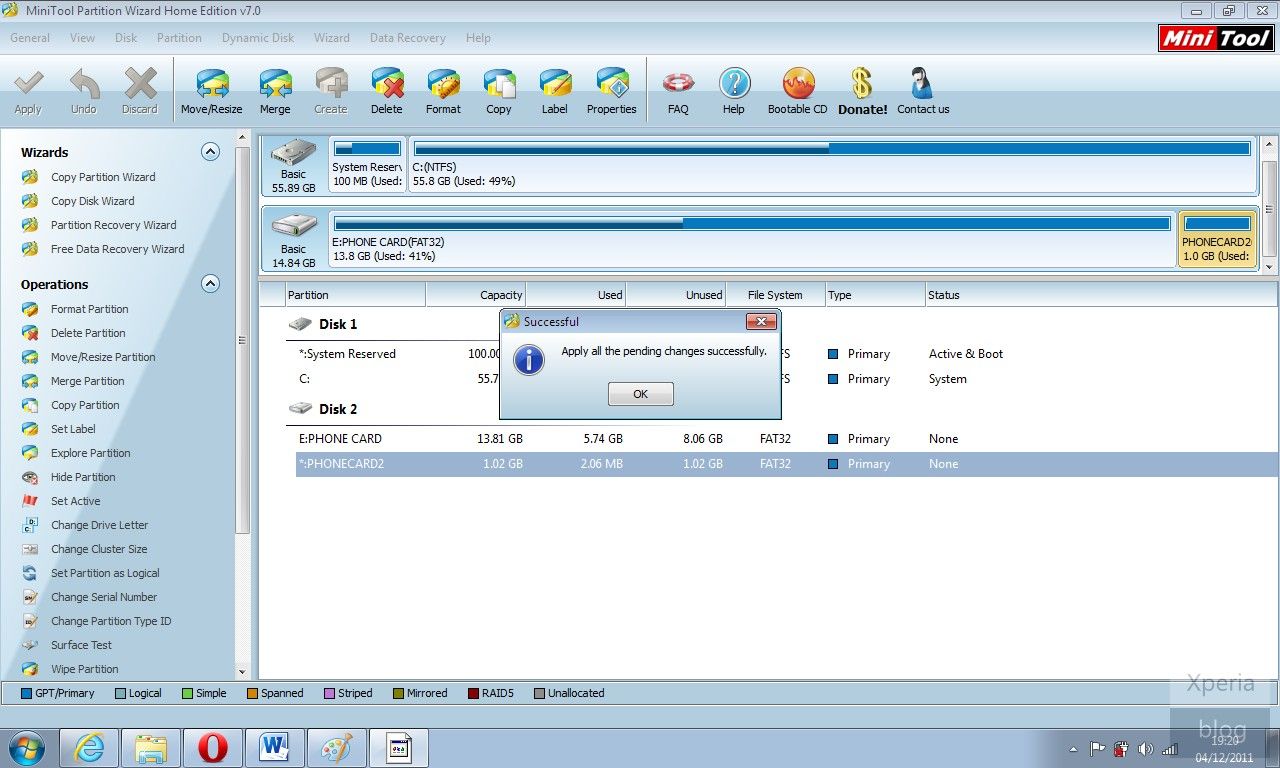
If successful, you should see message below. Congratulations your card is ready to use in conjunction with Link2SD.
5. LINK2SD
This application makes it easy for users with root privileges on their phone to move applications to the SD card.
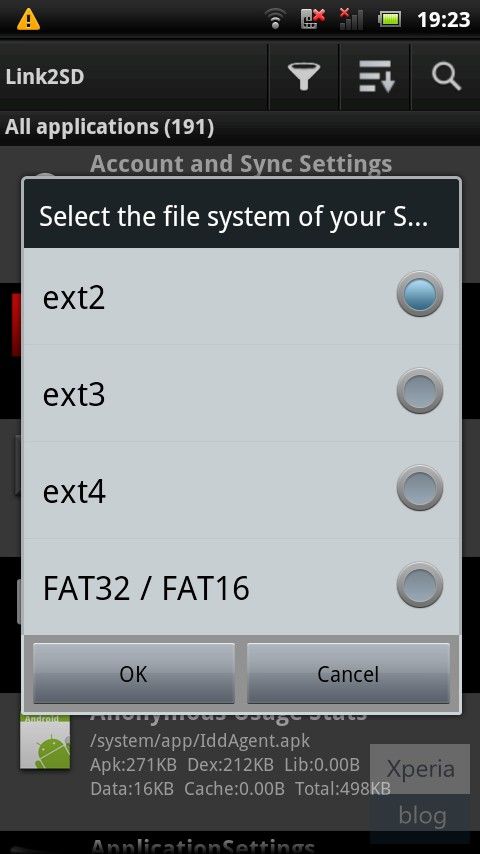
a) Open the Link2SD app on your phone. You should be greeted with the following menu, check the FAT32 option and click OK.
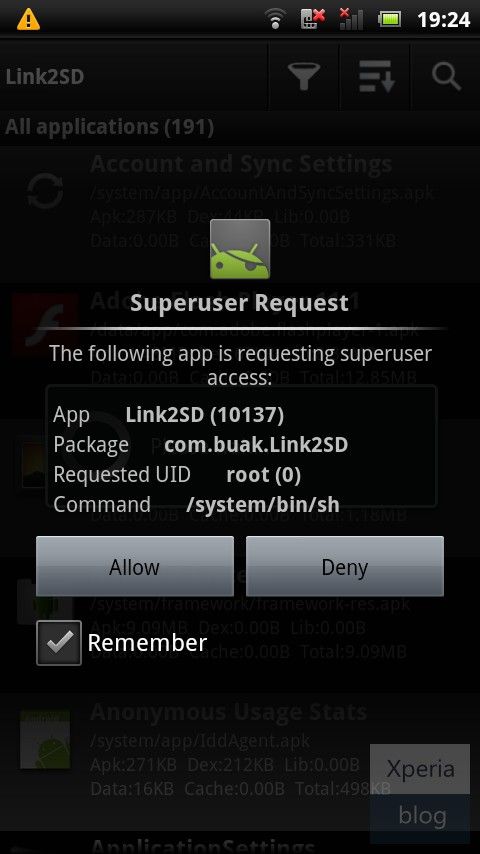
You will then see the Superuser Request, click ‘Allow’.
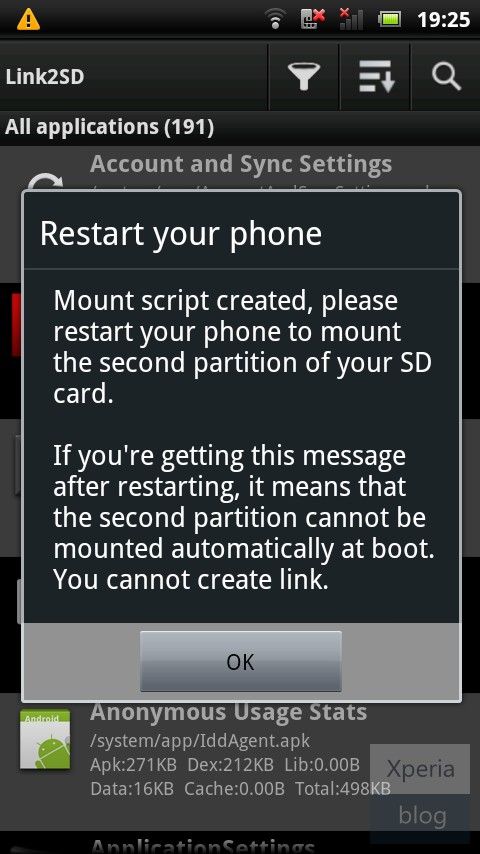
Once you see the following message, restart your phone. The app should now be ready to use.
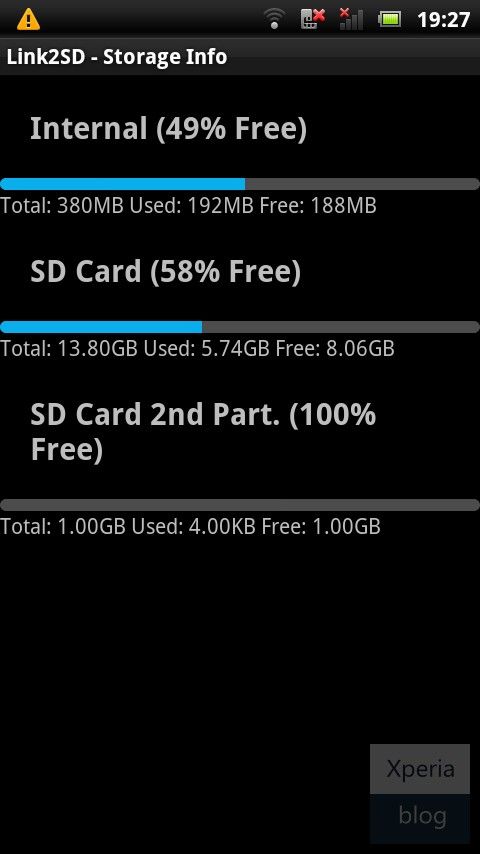
b) To make sure everything is installed correctly. Click the Menu button and go to ‘Storage Info’. This will show you the internal memory and your two partitions on the memory card. In our case, you can see that the second partition has 1GB free.
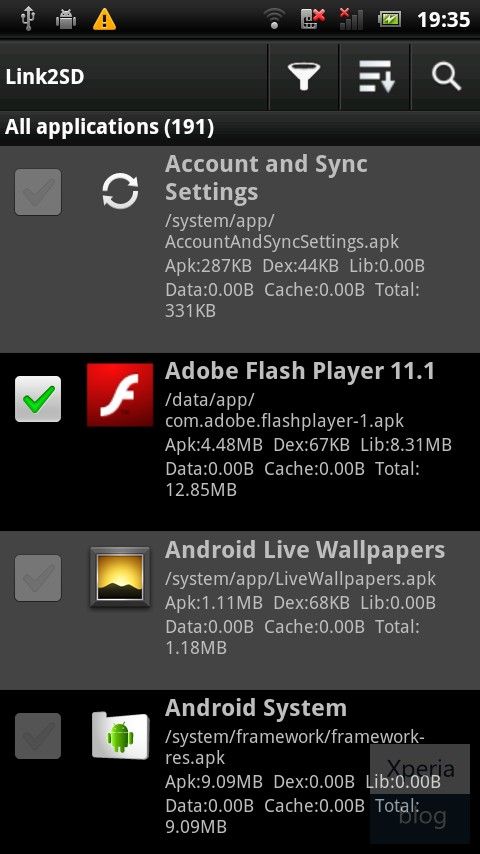
c) Now you need to move the apps of your choice to the memory card. Click the Menu button and press ‘Multi-select’.

Choose which apps you want to move by clicking the tick box next to the app. System apps are greyed out and cannot be selected. Link2SD can only move apps that are already on the internal memory. If you have apps already on your SD card, you will need to move them back to the internal memory before you can link them with Link2SD.
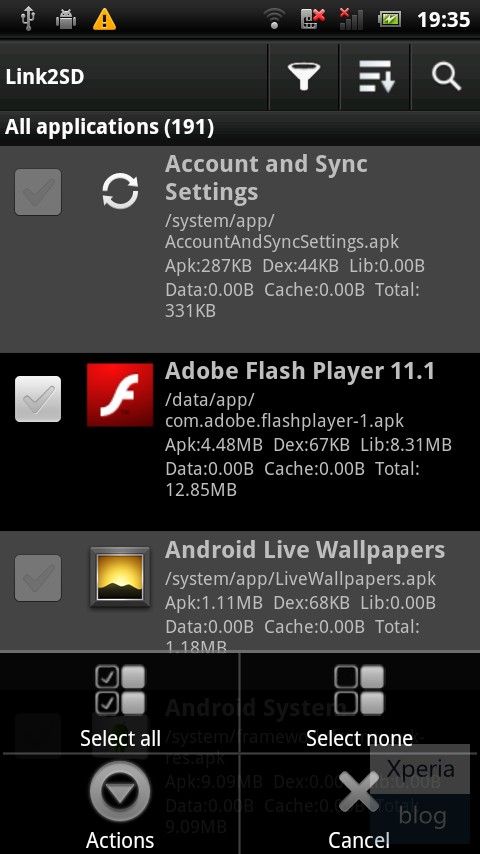
If you want to move all of your apps, pressing the menu button will bring up another menu allowing you to do this.
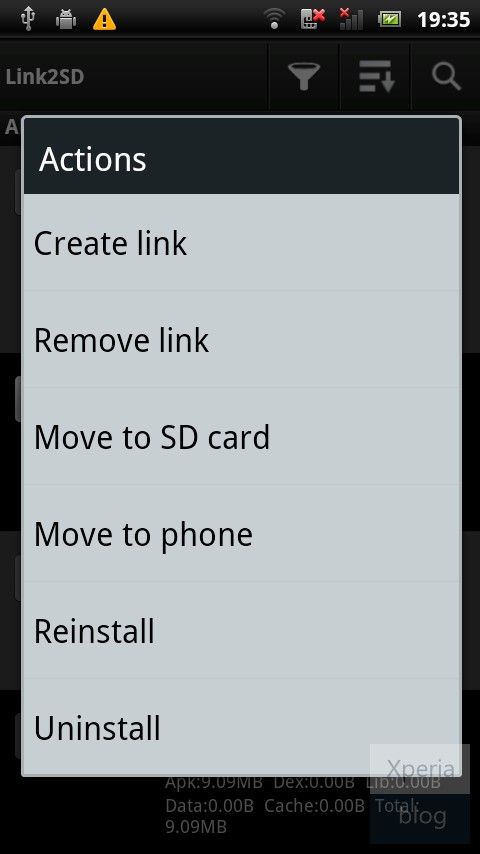
d) Once you have chosen which apps you want to move, you then need to hit the menu button and press ‘Actions’, which will bring up the following menu. Press ‘Create Link’.
Leave all three check boxes ticked and press OK. Link2SD will now do its work and move/link the selected apps to your memory card.
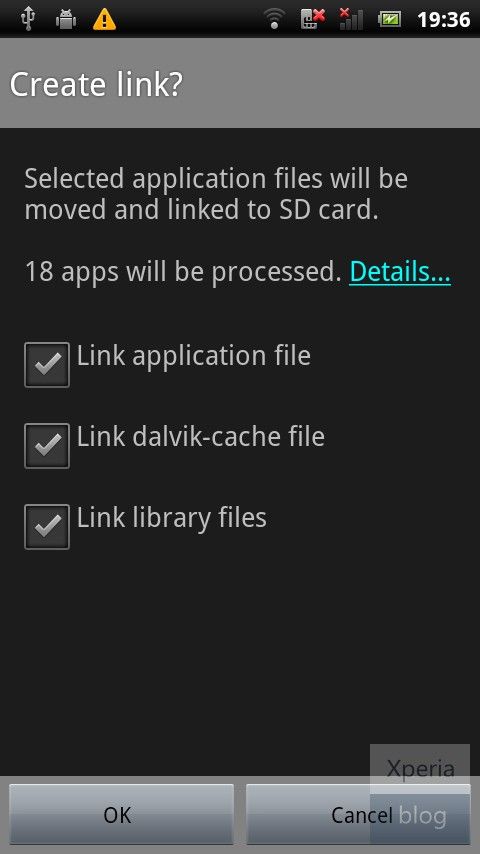
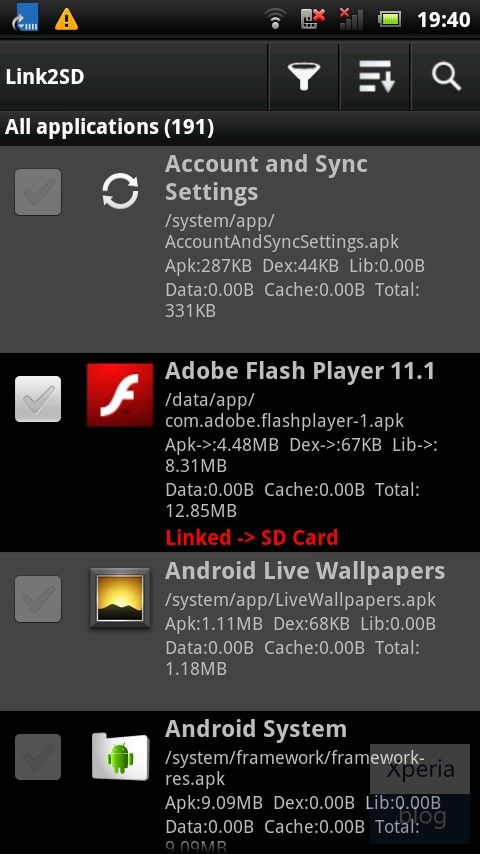
Once finished, you should see that the apps you have moved have ‘Linked -> SD Card’ in red font in the Link2SD app list. Reboot your phone.
e) Congratulations your phone is now using Link2SD! You should now go to Settings by pressing the menu button and configure how you would like Link2SD to work. The main decision here is whether you want to Auto Link newly installed apps to the memory card. Given that you’ve gone through the hassle of installing Link2SD we suggest you enable Auto Link and make worrying about your internal memory a thing of the past.

- Mark as New
- Bookmark
- Subscribe
- Mute
- Subscribe to RSS Feed
- Highlight
- Report Inappropriate Content
January 2012
January 2012
since this phone is dead now, there won't be any further udpates so you'll be stuck on 2.1, but if you want 2.2 or 2.3 then here is how
here you go 2.3
Xperia X10 mini pro
Xperia X10 mini
don't forget to mark the Correct & Helpful Answers
Not applicable
- Mark as New
- Bookmark
- Subscribe
- Mute
- Subscribe to RSS Feed
- Highlight
- Report Inappropriate Content
January 2012
January 2012
did that, but it did'nt help. First time for example when i write SMS or do something else and leave phone the screen turns off and lockes it, but after sometime it starts again by himself and doesnt turnt off.
- Mark as New
- Bookmark
- Subscribe
- Mute
- Subscribe to RSS Feed
- Highlight
- Report Inappropriate Content
January 2012
January 2012
ok then repair it with SEUS (update service) don't forget to backup
Not applicable
- Mark as New
- Bookmark
- Subscribe
- Mute
- Subscribe to RSS Feed
- Highlight
- Report Inappropriate Content
January 2012
January 2012
i have android 2.1. I'll try your suggestions later, because I'm at work right now, and I hope it will solve my problem. Thank you for suggestions  I will post response later if it helped me to solve my problem.
- Mark as New
- Bookmark
- Subscribe
- Mute
- Subscribe to RSS Feed
- Highlight
- Report Inappropriate Content
January 2012
January 2012
did it work?

0online
1903158posts